安装多主多网络网格

在两个集群上以多主多网络拓扑安装 Istio。

NOTE

在此操作步骤中,CLUSTER1East 集群,CLUSTER2West 集群。

您可以调整这些说明,以构建跨越两个以上集群的网格。

拓扑

跨集群边界的服务工作负载通过专用于东西向流量的网关间接通信。 每个集群中的网关都必须可从另一个集群访问。
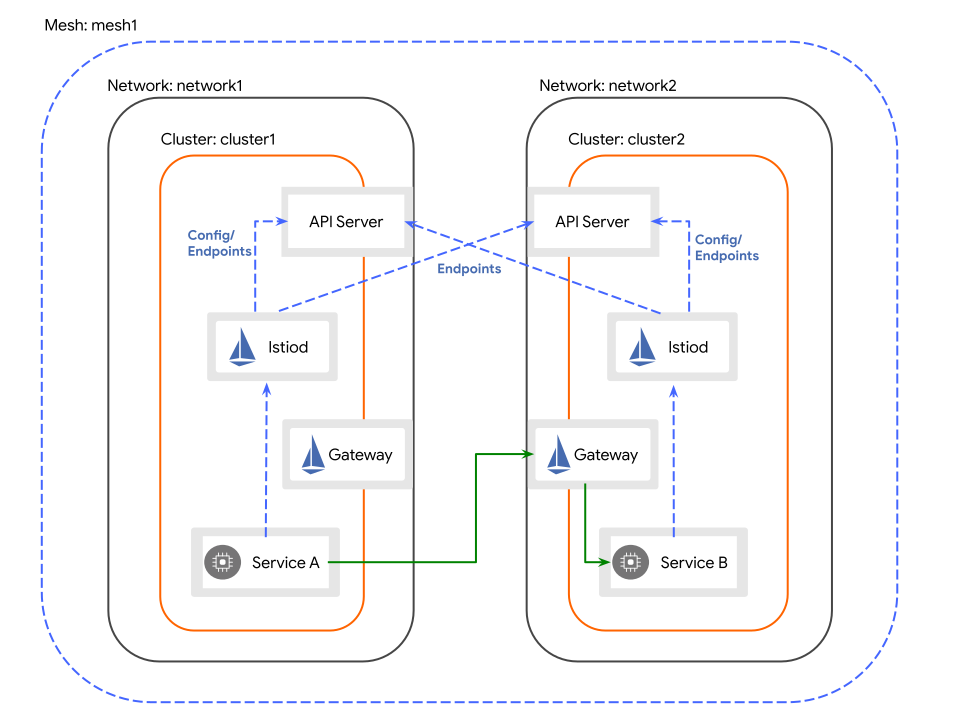
多主多网络拓扑

先决条件

  • 您已在组成网格的所有集群中安装 Alauda Container Platform Networking for Multus 插件,并且 kube-ovn 必须为 v4.1.5 或更高版本。
  • 您可以访问两个支持外部负载均衡器的集群。
  • 您已在组成网格的所有集群中安装 Alauda Service Mesh v2 Operator。
  • 您已完成为多集群网格创建证书
  • 您已完成将证书应用于多集群拓扑
  • 您已在本地安装 istioctl,以便使用它运行这些操作步骤。

操作步骤

创建定义待安装 Istio 版本的 ISTIO_VERSION 环境变量

export ISTIO_VERSION=1.30.4

East 集群上安装 IstioCNI

通过运行以下命令在 East 集群上安装 IstioCNI 资源:

kubectl --context "${CTX_CLUSTER1}" create namespace istio-cni
cat <<EOF | kubectl --context "${CTX_CLUSTER1}" apply -f -
apiVersion: sailoperator.io/v1
kind: IstioCNI
metadata:
  name: default
spec:
  version: v${ISTIO_VERSION}
  namespace: istio-cni
  values:
    cni:
      cniConfDir: /etc/cni/multus/net.d
      excludeNamespaces:
        - istio-cni
        - kube-system
EOF

East 集群上安装 Istio

  1. 通过运行以下命令在 East 集群上创建 Istio 资源:

    cat <<EOF | kubectl --context "${CTX_CLUSTER1}" apply -f -
    apiVersion: sailoperator.io/v1
    kind: Istio
    metadata:
      name: default
    spec:
      version: v${ISTIO_VERSION}
      namespace: istio-system
      values:
        global:
          meshID: mesh1
          network: network1
          multiCluster:
            clusterName: cluster1
          proxy:
            seccompProfile:
              type: RuntimeDefault
    EOF
  2. 运行以下命令,等待控制平面返回 Ready 状态条件:

    kubectl --context "${CTX_CLUSTER1}" wait --for condition=Ready istio/default --timeout=3m
  3. 通过运行以下命令在 East 集群上创建东西向网关:

    WARNING

    对于运行早于 4.11 的 Linux 内核版本的节点(例如 CentOS 7),必须在安装网关前完成其他配置

    kubectl --context "${CTX_CLUSTER1}" apply -f https://raw.githubusercontent.com/alauda-mesh/sail-operator/release-2.2/docs/deployment-models/resources/east-west-gateway-net1.yaml
    可选:将东西向网关部署到 Infra Nodes(点击展开)

    运行以下命令修补网关部署:

    kubectl --context "${CTX_CLUSTER1}" patch deployment istio-eastwestgateway -n istio-system \
      --type='merge' \
      --patch '{
        "spec": {
          "template": {
            "spec": {
              "nodeSelector": {
                "node-role.kubernetes.io/infra": ""
              },
              "tolerations": [
                {
                  "effect": "NoSchedule",
                  "key": "node-role.kubernetes.io/infra",
                  "value": "reserved",
                  "operator": "Equal"
                }
              ]
            }
          }
        }
      }'
  4. 通过运行以下命令使服务通过网关暴露:

    kubectl --context "${CTX_CLUSTER1}" apply -n istio-system -f https://raw.githubusercontent.com/alauda-mesh/sail-operator/release-2.2/docs/deployment-models/resources/expose-services.yaml

West 集群上安装 IstioCNI

通过运行以下命令在 West 集群上安装 IstioCNI 资源:

kubectl --context "${CTX_CLUSTER2}" create namespace istio-cni
cat <<EOF | kubectl --context "${CTX_CLUSTER2}" apply -f -
apiVersion: sailoperator.io/v1
kind: IstioCNI
metadata:
  name: default
spec:
  version: v${ISTIO_VERSION}
  namespace: istio-cni
  values:
    cni:
      cniConfDir: /etc/cni/multus/net.d
      excludeNamespaces:
        - istio-cni
        - kube-system
EOF

West 集群上安装 Istio

  1. 通过运行以下命令在 West 集群上创建 Istio 资源:

    cat <<EOF | kubectl --context "${CTX_CLUSTER2}" apply -f -
    apiVersion: sailoperator.io/v1
    kind: Istio
    metadata:
      name: default
    spec:
      version: v${ISTIO_VERSION}
      namespace: istio-system
      values:
        global:
          meshID: mesh1
          network: network2
          multiCluster:
            clusterName: cluster2
          proxy:
            seccompProfile:
              type: RuntimeDefault
    EOF
  2. 运行以下命令,等待控制平面返回 Ready 状态条件:

    kubectl --context "${CTX_CLUSTER2}" wait --for condition=Ready istio/default --timeout=3m
  3. 通过运行以下命令在 West 集群上创建东西向网关:

    WARNING

    对于运行早于 4.11 的 Linux 内核版本的节点(例如 CentOS 7),必须在安装网关前完成其他配置

    kubectl --context "${CTX_CLUSTER2}" apply -f https://raw.githubusercontent.com/alauda-mesh/sail-operator/release-2.2/docs/deployment-models/resources/east-west-gateway-net2.yaml
    可选:将东西向网关部署到 Infra Nodes(点击展开)

    运行以下命令修补网关部署:

    kubectl --context "${CTX_CLUSTER2}" patch deployment istio-eastwestgateway -n istio-system \
      --type='merge' \
      --patch '{
        "spec": {
          "template": {
            "spec": {
              "nodeSelector": {
                "node-role.kubernetes.io/infra": ""
              },
              "tolerations": [
                {
                  "effect": "NoSchedule",
                  "key": "node-role.kubernetes.io/infra",
                  "value": "reserved",
                  "operator": "Equal"
                }
              ]
            }
          }
        }
      }'
  4. 通过运行以下命令使服务通过网关暴露:

    kubectl --context "${CTX_CLUSTER2}" apply -n istio-system -f https://raw.githubusercontent.com/alauda-mesh/sail-operator/release-2.2/docs/deployment-models/resources/expose-services.yaml

East 集群上安装可访问 West 集群 API 服务器的远程密钥

istioctl create-remote-secret \
  --context="${CTX_CLUSTER2}" \
  --name=cluster2 \
  --create-service-account=false | \
  kubectl --context="${CTX_CLUSTER1}" apply -f -

West 集群上安装可访问 East 集群 API 服务器的远程密钥

istioctl create-remote-secret \
  --context="${CTX_CLUSTER1}" \
  --name=cluster1 \
  --create-service-account=false | \
  kubectl --context="${CTX_CLUSTER2}" apply -f -

验证多集群拓扑

要确认多集群拓扑正常运行,您将在两个独立的 Alauda Container Platform 集群上部署示例应用。目标是建立一个可生成和观察跨集群流量的基准环境。

操作步骤

首先在 East 集群上部署必要的示例应用。

此集群将托管 helloworld 服务的 v1 版本。

  1. East 集群上为应用创建专用命名空间。

    kubectl --context="${CTX_CLUSTER1}" create namespace sample
    kubectl --context="${CTX_CLUSTER1}" label namespace sample pod-security.kubernetes.io/enforce=restricted --overwrite
  2. 通过应用所需标签,为 sample 命名空间启用自动 Istio sidecar 注入。

    kubectl --context="${CTX_CLUSTER1}" label namespace sample istio-injection=enabled
  3. 部署 helloworld 应用组件。

    a. 首先建立 helloworld 服务端点。

    kubectl --context="${CTX_CLUSTER1}" apply \
      -l service=helloworld -n sample \
      -f https://raw.githubusercontent.com/alauda-mesh/istio/refs/heads/istio-1.30/samples/helloworld/helloworld.yaml

    b. 然后部署 helloworld 应用的 v1 实例。

    kubectl --context="${CTX_CLUSTER1}" apply \
      -l version=v1 -n sample \
      -f https://raw.githubusercontent.com/alauda-mesh/istio/refs/heads/istio-1.30/samples/helloworld/helloworld.yaml
  4. 部署 sleep 应用,该应用将作为发送测试请求的客户端。

    kubectl --context="${CTX_CLUSTER1}" apply \
      -n sample \
      -f https://raw.githubusercontent.com/alauda-mesh/istio/refs/heads/istio-1.30/samples/sleep/sleep.yaml
  5. 暂停操作,直到 helloworld-v1 部署完全可用并就绪。

    kubectl --context="${CTX_CLUSTER1}" wait --for condition=available -n sample deployment/helloworld-v1 --timeout=3m
  6. 同样,等待 sleep 部署报告 Ready 状态。

    kubectl --context="${CTX_CLUSTER1}" wait --for condition=available -n sample deployment/sleep --timeout=3m

West 集群上复制此设置。

此集群将托管 helloworld 服务的 v2 版本。

  1. West 集群上创建 sample 命名空间。

    kubectl --context="${CTX_CLUSTER2}" create namespace sample
    kubectl --context="${CTX_CLUSTER2}" label namespace sample pod-security.kubernetes.io/enforce=restricted --overwrite
  2. 同样为此命名空间启用 Istio sidecar 注入。

    kubectl --context="${CTX_CLUSTER2}" label namespace sample istio-injection=enabled
  3. 部署 helloworld 应用组件。

    a. 在 West 集群上创建通用的 helloworld 服务端点。

    kubectl --context="${CTX_CLUSTER2}" apply \
      -l service=helloworld -n sample \
      -f https://raw.githubusercontent.com/alauda-mesh/istio/refs/heads/istio-1.30/samples/helloworld/helloworld.yaml

    b. 部署 helloworld 应用的 v2 实例。

    kubectl --context="${CTX_CLUSTER2}" apply \
      -l version=v2 -n sample \
      -f https://raw.githubusercontent.com/alauda-mesh/istio/refs/heads/istio-1.30/samples/helloworld/helloworld.yaml
  4. West 集群上部署客户端 sleep 应用。

    kubectl --context="${CTX_CLUSTER2}" apply \
      -n sample \
      -f https://raw.githubusercontent.com/alauda-mesh/istio/refs/heads/istio-1.30/samples/sleep/sleep.yaml
  5. 等待 helloworld-v2 部署完全可用。

    kubectl --context="${CTX_CLUSTER2}" wait --for condition=available -n sample deployment/helloworld-v2 --timeout=3m
  6. 最后,确保 West 集群上的 sleep 部署已就绪。

    kubectl --context="${CTX_CLUSTER2}" wait --for condition=available -n sample deployment/sleep --timeout=3m

验证集群间的流量流动

两个集群上的应用都已部署并运行后,下一步是发送请求,并确认流量已在整个服务网格中正确进行负载均衡。

  1. East 集群中的 pod 向 helloworld 服务发送一系列 10 个请求。

    for i in {0..9}; do \
      kubectl --context="${CTX_CLUSTER1}" exec -n sample deploy/sleep -c sleep -- curl -sS helloworld.sample:5000/hello; \
    done

    预期结果是收到来自 helloworld-v1East)和 helloworld-v2West)的混合响应,证明服务网格正在跨集群边界路由请求。

    示例输出
    Hello version: v1, instance: helloworld-v1-644474db4b-7cwhz
    Hello version: v2, instance: helloworld-v2-645cb7fc46-lnbb7
    Hello version: v1, instance: helloworld-v1-644474db4b-7cwhz
    Hello version: v1, instance: helloworld-v1-644474db4b-7cwhz
    Hello version: v1, instance: helloworld-v1-644474db4b-7cwhz
    Hello version: v2, instance: helloworld-v2-645cb7fc46-lnbb7
    Hello version: v2, instance: helloworld-v2-645cb7fc46-lnbb7
    Hello version: v1, instance: helloworld-v1-644474db4b-7cwhz
    Hello version: v2, instance: helloworld-v2-645cb7fc46-lnbb7
    Hello version: v1, instance: helloworld-v1-644474db4b-7cwhz
  2. West 集群执行相同的测试。

    for i in {0..9}; do \
      kubectl --context="${CTX_CLUSTER2}" exec -n sample deploy/sleep -c sleep -- curl -sS helloworld.sample:5000/hello; \
    done

    同样,您应观察到该服务来自 v1v2 的响应,从而确认无论请求从何处发起,多集群负载均衡都能正常工作。

从开发环境中移除多集群拓扑

完成验证和试验后,应拆除多集群配置,以清理开发环境并释放资源。

操作步骤

  1. 执行一条命令,从 East 集群中移除所有 Istio 组件和示例应用。

    kubectl --context="${CTX_CLUSTER1}" delete istio/default istiocni/default ns/sample ns/istio-system ns/istio-cni
  2. 运行相应命令,在 West 集群上执行相同的清理操作。

    kubectl --context="${CTX_CLUSTER2}" delete istio/default istiocni/default ns/sample ns/istio-system ns/istio-cni